Showing posts with label DIY. Show all posts

8.28.2014

Tools and Toys

A nine year old girl shot and killed an instructor on a gun range in Nevada yesterday.

Here's a picture of my son with the products of his first big date with a plasma arc welder. He's older than nine, of course, but he started using air hammers, drill presses, and hammer drills when he was around eight. He started using a die grinder when he was ten. These tools are useful, but can maim or even kill if handled poorly.

So why does this not feel the same as putting a automatic weapon in a little girl's hands? Yes, an Uzi is a dangerous object with notorious muzzle climb that a small child is inherently going to have trouble controlling. By comparison, a hammer drill has a much more limited potential to get out of hand.

But that's not the salient point. A hammer drill is a tool for making holes in concrete and such. That's what we use it for. I taught my boy to use it so he could do real work with it around the place. An Uzi, in contrast, is a weapon of war. There is no target shooting class you can use an Uzi in, certainly not in full-auto. Blowing through a clip on an Uzi is not a sport. A civilian shooting an Uzi is taking a soldier's tool and treating it like a toy. Part of what seems so wrong about the Nevada shooting is that the little girl wasn't learning the sport of shooting: she was playing the game of war with a real weapon, and the weapon worked as designed.

I'm guessing my mom learned to shoot when she was around nine. I learned when I was a little older than that. I like going to gun ranges and shooting guns. If I didn't have a bad feeling about killing things, I'd probably hunt. So I actually kind of understand why parents would take their nine year old girl to a gun range. Kind of. Maybe twelve would have been better. And I understand that guns are pretty important to them, so in the same way I want my son to know the tools so he can be a maker and make things, they want their girl to be a shooter. I cringe at the idea of putting firearms at the center of your identity, but I can't pick for somebody else.

But treating weapons as toys is a problem, and this incident shows one reason why. There is a little thrill of focussed attention that never goes away when you are handling a dangerous object, but if that thrill becomes the point, and you start needing bigger and bigger hits of it, then your hobby is more than just a hobby. This is so far away from target shooting as a sport. There is no sport here, only playing dangerous games.

Condolences to the survivors of the incident in Nevada.

11.21.2013

Blowing a Gasket

What's left of the combustion air gasket of our condensing boiler.

Condensing boilers are great, but the pH of the exhaust can be pretty low. Low enough to dissolve the gasket that came with the boiler. So Triangle, the manufacturer, came out with a replacement kit with a gasket that is much tougher than the stock HDPE o-ring it came with.

What you are looking at is the remains of this replacement gasket in the cleanout for the boiler's drain line.

Now Triangle has a new gasket kit with a supposedly even better gasket. Let's hope I'm $28 from a correctly working boiler.

Does this matter? A little. The exhaust is corrosive, so when the gasket's gone there is always a little corrosive, humid air leaking into the basement. Not very much, but the gasket's there in the first place because your flue isn't supposed to leak into your house.

Oh, and carbon monoxide, but not much of that on a condensing boiler, and I have a CO sensor in the basement. So far, no detectable CO.

I think anybody with gas-fired space heat or water heater should have a CO sensor. They're cheap, so there's no reason not to.

It also doesn't hurt to look over all your major systems fairly thoroughly once a year. I caught this one pretty much by accident because my father-in-law and I were talking furnaces and one thing led to another. I have a list of annual maintenance items. Checking the boiler cleanout for signs of gasket degradation is now on the list.


10.14.2013

How to tell Eneloop batteries apart


Sanyo is now making the 3d generation of their Eneloop battery, the best NiMH rechargeable battery ever made. There are various special high-capacity and other versions, but their advantages are dubious in almost all situations: the standard Eneloop is almost always best: for about $3, you get an AA battery than can be charged 1800 times and after sitting on a shelf or in a Tickle-me-Elmo for five years, still has most of its juice left.

(Actually, there is a 4th generation Eneloop battery that is easy to identify because it says "Panasonic" on the side, but these are not available in the US yet.)

If you've bought Eneloops over the years or you buy used electronics that have Eneloops already in them, you may want to tell the different generations apart. The main reason for this is to avoid mixing and matching different batteries. And that's important --not usually. You shouldn't mix different brands or models of batteries, but would you even notice if you put one version 1 Eneloop in with 3 version 3s?

Probably not, but when a device takes several batteries together, run-time will only be as good as the weakest battery. So those fancy new V3 batteries are now limited to the performance of a V1 battery. That's irrelevant in a TV remote, and and probably a small difference in an RC toy. But in a flashlight or a bike light, it could make a big difference in run time.

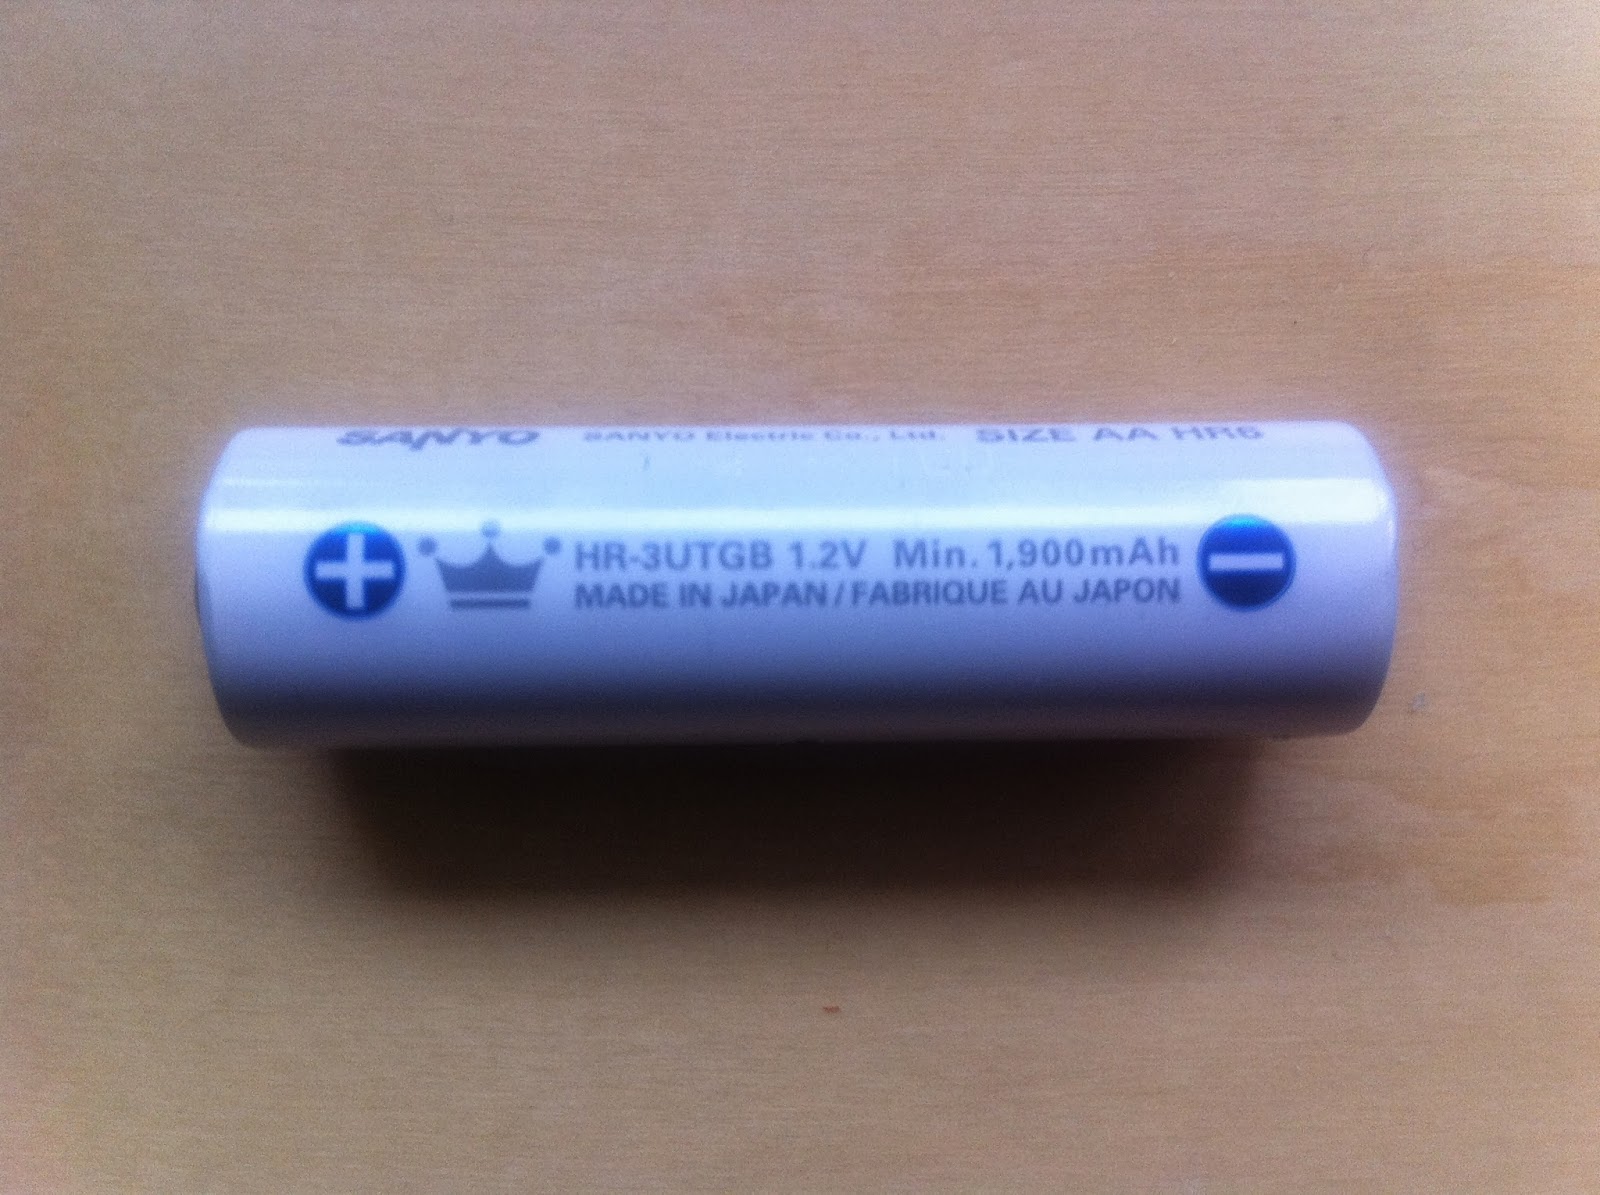
The different Eneloop AA batteries all have a code on them to identify the generation. The battery above has a code next to the crown. First generation are HR-3UTG, second are HR-3UTGA, and third generation are HR-3UTGB. The battery above is therefore a third generation battery. AAA batteries have a 4 in place of the 3, so a 2nd generation AAA has a code of HR-4UTGA.

The picture at right shows first- and third-generation AA batteries. Changes in layout and the addition of an EU "don't put in regular recycling" bug make it easy to separate these two if you know what you're looking for.

In store packaging, 3rd generation Eneloops have "1800" in orange prominently printed on the blister pack.

Third generation batteries have significantly lower self-discharge, so they can last for years in your emergency flashlight and still have most of a charge when the power finally does go out. They also operate at very low temperatures --important for bike lights and other outdoor uses.

And, of course, the 3rd generation batteries provide more charge cycles. You may not think you need 1800 charge cycle, but a high charge cycle rating means the battery will maintain its typical capacity over a higher fraction of those charge cycles, even if you subject it to high current, deep discharge, low temperature, vibration --in other words, a typical day in the life of a battery that works for me.

Rechargeable batteries are now so good that you can just use them for years and replace them when they seem tired. But if you want, you can get more performance out of your rechargeable batteries by periodically reconditioning them. If that sounds like becoming a full-on battery otaku, it' actually not a big deal, but I'll save that topic for another day.

10.02.2013

SAE What?

Here are the two most dangerous SAE screws to get mixed in with your ISO (metric, as in bike) screws. They are the 1/4"-28 and the 10-24, shown with the ISO screws they are confused with at right. The SAE screws are 1/2" long, the ISO screws are 12mm, slightly shorter. Shown here are button screws. Each "wrong" button screw will also take the "right" screw's Allen key, with a slightly loose fit.
  • The 1/4"-28, at bottom, is slightly bigger than the M6 above it, with slightly looser threads. When I hold two these at arms-length, I can't tell which is which, let alone identify one by iself.
  • The 10-24, second from top, has coarser threads than the M5 above it. This seems obvious, but doesn't actually take much carelessness to miss, especially if you don't work in a bike shop surrounded my M5 threads all day. The bottom of the 10-24's threads are quite a bit deeper than the M5's, but because coarser threads are thicker, the outside diameters of the screws are about the same.
What happens when an SAE screw is used by mistake on a bike? Nothing good, of course. In my previous post, I discussed my adventures with 10-32 screws and nuts versus M5, but all I wielded in anger was a thread gauge. This time, wanting to know the whole horror story, I got out the tools to wreck some hardware.

The 1/4"-28 is notorious for destroying bike bosses. I used a torque wrench to thread it into an M6 nut. The screw progressively stiffened to 20 Nm. At this point the screw was visibly cross-threaded into the nut. M6 screws are often torqued to 25 Nm or higher; on stems, aero bars, and the like. Threading by hand, it's obvious something is wrong, but a torque wrench is long enough to make 20 Nm easy to turn. But even using an Allen key, by the time it's clear that something is wrong, the threads on the bike are likely destroyed.

I backed out the 1/4"-28 and threaded in the correct M6, which promptly bound. Forcing it did not help. attempts to back the screw out again succeeded only in shearing off the screw. If I had conducted this experiment using an actual bike instead of a special stunt-nut in place of the bike, I would now have a huge mess on my hands.

Thanks to Adrian Burns for pointing out the perils of the 1/4"-28.

The 10-24 is insidious. It's easier to spot, but if missed, it threads in and appears to work. Yes, it's a bit stiff, but even with dry threads I never measured above 5 Nm. Once it's in, it appears to hold. Your rack or bottle cage is now mounted. But the bike's threads are trashed, and the screw will probably loosen. If thread locker doesn't help, you may try a new screw, doubtless an actual M5. Then the real grief starts.

I simulated this by tightening a 10-24 down to about 10 Nm. The screw wouldn't strip through at this torque, but it easily loosened. I then backed it out of the nut and threaded an M5 screw. This was stiff for a few turns as the M5 reformed the damaged threads. Then the M5 became rattle-loose in the nut. Now nothing will fit that hole until it is drilled and tapped for something larger.

I try not to keep any of these problem-child screws around, especially not in the heads and lengths used for bikes, especially in stainless, which is used a lot for bikes. If I feel like I have to stock one of these, I'll mark it on both ends with a red laundry marker to remind me that it's trouble.

9.29.2013

Oh SAE, can you see?

Today, I did something that I should have done a long time ago, and something that anybody who works on bikes (or cars, for that matter) in North America should probably do. I took M5 (metric) and 10-32 (SAE*) bolts and compared them side-by-side. The thread shapes and angles are the same. The M5 has pitch diameter of 4.48mm and pitch of 0.8mm. The 10-32 has pitch diameter of 4.31mm and pitch of 0.79mm. The SAE bolt is less than 5% smaller with pitch less than 1% tighter. See for your self in the picture to the right. (M5 on the bottom.)

An M5 bolt will thread into a 10-32 nut, and then bind, resulting in an insecure fastening and probably ruined fasteners. A 10-32 bolt will thread into an M5 nut, but won't hold. A 10-24 bolt's threads are obviously too coarse, especially if you have an M5 to compare, but it's still nearly the right size. If you use a bit of force, a 10-24 bolt will thread into an M5 nut a few turns, and then seize. If you keep forcing, you'll probably strip the nut. Most bike bosses are M5, so forcing a 10-24 bolt into a bike boss is a quick way to banjax a bike frame. Don't ask me how I know this. (The simple solutions are to either drill and tap the boss out to M6 or use a nut on the back side forever.)

In the second picture, from top to bottom: 12-24, M6, 1/4"-20. The M6 is the only one that I should let anywhere near my bike. The 12-24 will thread loose into an M6 hole, such as some bike rack bosses, but it won't hold. An M6 will thread a few turns into a 12-24 nut, but additional turns ruin the threads. Same with a 1/4"-20 and an M6.

A metric/SAE screw gauge costs $4. That's a one-beer tool. A metric thread gauge is $7, a beer-and-a-half tool. So I have these, and if I'm at all doubtful of the path by which a fastener came to be headed towards my bike, out come the gauges. It's much faster than half breaking a boss and then having to half-fix it.

And I keep my bike fasteners well separate from anything that might be SAE. Harder to do at home than it would be in a bike shop, but it's not that big a deal to buy a $10 plastic bin tray to hold just my bike fasteners, nothing else allowed. SAEs who? SAEs me!

*Yeah, yeah, I know there are no "SAE" fasteners since, 1949, when UTS superseded SAE. Go ahead and try to buy a "UTS" fastener in a hardware store. Thought so.

9.25.2013

Front Fender

This is a setup I've had for about 5,000 miles. It broke, so I made it again, but stronger, so hopefully it lasts longer.

I wanted a front fender that extended in front of the brake, and I wanted to mount a light low. It all came together as a DiNotte 1200+, a piece of ABS, and a rack bracket bent over the brake as shown in the picture, to be fixed by the brake bolt.

It worked great for 5,000 miles, and then it broke, near the bolted end. Vibration-induced fatigue, obviously. So this time, two pieces of steel, together about 20% thicker than the original, deliberately separated a bit to damp vibration. Hopefully good for more than 5,000 miles.

I'm sure someone will complain that that fender is too high, and should be closer to better block spray. But it actually blocks a lot of water. By the time water is shedding off of the top of the tire, it's in a pretty thin line along the center most of the time.

8.09.2013

Corrosion --now in 3D

In reference to my previous treatise on battery terminal corrosion, you can now view a 3D image of a corroded battery terminal at the Lytro site here.

OK, probably, you don't want to do that. It's more fun than it sounds like, but still....


8.06.2013

Padding

Here is the outer (leftmost) brake pad I recently pulled from my front Avid BB7 disc brake caliper. The part of the pad closer to the hub is at right in the picture. The "top" of the pad furthest from the hub is at left.

The top of the pad still has some material left on it, so should I have let the pads go longer? No. Look at the second picture, below. This focal plane shows more clearly that the pad has not worn evenly, to the point that the copper "panhandle" that sticks out of the caliper has obviously been hitting the rotor during braking. Oops. So yeah, it was time to change the brake pads. (Both of these images are from a single picture from a Lytro camera.)

Measuring with a caliper, the top had about 1200µm of pad left, and the bottom had at most 300µm left.

Interestingly, the inner pad is worn completely differently. The inner pad wore evenly top-to-bottom, but the front edge had had 950µm and the trailing edge 1100µm. So the inner pad wore almost flat by comparison, except the leading edge wore a bit faster.

Why did the pads wear unevenly? Well, I'm not sure.

Maybe I didn't set the brakes up correctly? BB7s mount with spherical fixing bolts, so that you can align the caliper in two axes with the rotor. Avid's old instructions and Park's current instructions for this are laughably incomprehensible, so I figured out a simple way: put in new pads, set the pad distance. Squeeze the caliper shut on a trued rotor. Tighten the fixing bolts. So maybe that's wrong? I checked the Avid site. Avid's new instructions are pretty much exactly what I did. So that's not it: AFAICT, the caliper was set up with the caliper coplanar with rotor. There isn't much play in the caliper inboard and outboard, but even if there were, the caliper is designed to compensate for that by adjusting the pad positions. This is necessary, since hubs vary in exactly how outboard from centerline they mount the rotor.

Maybe I had let the pad positions get out of adjustment? The BB7 has two knobs to adjust the pads inwards as they wear. The outer pad is on a piston that pushes it towards the fixed inner pad. Obviously, the rotor makes an angle as it's bent, and obviously the force of the rotor is going to be higher on the top of the outside pad and the bottom of the inside pad. But that's the opposite of the wear pattern on the outside pad, and the inside pad wore evenly. So that seems unlikely.

Maybe the pads aren't coplanar? I doubt the caliper body is bent, since it's so stout that I find it hard to believe a blow hard enough to bend it wouldn't throw it completely out of alignment. The piston that pushes the outer pad in obviously has more play in it than the fixed holder on the inner side, so maybe this is just as good as it gets. One way to look at it is, I got 3 winters off of a set of brake pads that cost me less than $20. (The rear pads will probably last a couple more winters yet.)

Hmm. If you have any experiences or ideas, or interesting things to measure, I'm all ears.


8.03.2013

Corrosion

[UPDATE: see a 3D image of the corroded battery terminal here.]

AA battery packs are cool, but check for corrosion.

If your bike is transportation, or if you like endurance bike sports, you need bike lights. Hikers, climbers, spelunkers, and other outdoor sportsters also often need lights or other battery-powered devices. AA NiMH batteries are a cheap, effective solution. Damp weather and vibration can corrode contacts and degrade performance. Damp combined with vibration degrades performance faster.

The picture at right shows a corroded spring contact in a battery holder. This contact is at the bottom of the holder, and the spring at the top of the holder was not noticeably corroded, so moisture was the main problem here. (Leaking batteries cause corrosion too, although not in this case.)

GPS units that take AA batteries are notorious for vibration problems causing arcing, resulting a sort of electro-fretting that damages contacts on both the battery and the GPS. This is noticable because the GPS tends to reset whenever it loses power. The same problem happens with battery-powered lights, it's just hard to tell when it is happening. But the damage is serious. You can sand the corrosion off the contacts, but spring contacts are usually plated to combine long fatigue life with good electrical performance. Once the plating is corroded, the contact will never work as well again. Many GPS units now build Li-ion batteries into the device, eliminating this problem. Garmin makes a kit for their older GPS units with an extra tension spring to increase the spring force on the batteries. If you have this kit, I strongly recommend using the tension spring. It looks like an extra bit of hassle, but it is actually very useful.

One advantage of battery holders: replacing the battery holder also replaces all battery contacts. For example, DiNotte make nice lights that provide several hours of operation from a pack of four NiMH AA batteries in a standard "BH343" battery holder, shown at right. The holder has a connector like a 9v battery and cost $1-$2. Good NiMH batteries like Eneloops cost $3 each and a 4-pack will hold 10-12Wh.

I tape the batteries into the holders with electrical tape and use a battery pack charger (popular with RC enthusiasts) as I explain here. Taping the batteries seems to eliminate vibration problems. (Otherwise, the batteries will sometimes slip all the way out of the holder, a serious vibration problem!) But you then have to use a pack charger, which is very convenient anyway.

A battery pack is only as good as its weakest battery, so it's even more important to use good quality NiMH batteries when pack charging. I notice that after about two winters, battery life seems to get much shorter. So I tear the battery packs apart and recondition them with a La Crosse BC-700 battery charger.

Actually, a battery pack is only as good as its weakest link. I started scrutinizing the battery holders when I noticed that they would eventually crack, which reduces spring tension, and the connector to the light would also loosen, and would need to be (carefully, without shorting!) re-crimped once in a while. Then I started noticing corrosion. Once I started looking for corrosion, I started to find a lot of it.

I think 2 Seattle winters is probably all one of these battery holders is good for. After that, it's time to break down the battery pack, and recondition the batteries. The BC-700 tells me what the reconditioned capacity of each battery is. If it's over 90% of new, I put them into a new battery holder and give them another 2 years. Otherwise they get relegated to less demanding applications and eventually recycled. Either way, I now only use the battery holders once.

5.12.2013

Opener for the gate


The gate latch needed an opener for the other side. Has needed for a couple of years.

After some thought, I decided to use a bicycle shift cable that was plenty strong for this application, but had some minor damage that made me not want to put it on a bike. Putting the shift cable in a left-over piece of housing allows someone to pull down on the cable from the other side, pulling up on the catch for the the gate and opening the gate.

I cut a piece of dowel to use as a handle and threw in a carriage bolt I had lying around. Perfect. I used CATV brads to tack the cable housing to both sides of the gatepost.

Except, there is a problem with these latches: if there is even a very small upward force on the attachment, it keeps the latch open, so that the gate never closes. The cable moves very smoothly in the housing, so even a very light handle will drag the latch open. So now the gate has an opener, but the opener kept the gate from closing.

I thought a bit, and realized the solution was quite simple: remove the brad holding the housing on the inside of the gate. The housing springs outward, pulling the latch closed. Pulling down on the handle on the other side pulls the housing towards the latch, then pulls the shift cable through the housing, opens the latch, and opens the gate.

It's probably lucky I decided to use shift cable and housing. Modern shift cable housing is quite stiff compared to typical brake housing, so brake housing may not have been springy enough to work.

9.02.2012

Clothes Moths

The shame of wool moths. Nobody likes to talk about it, but let's face it: many bikers, especially randonneurs, own their share of wool, and that wool is not always stored clean. These conditions favor wool moths. What I've learned might be useful to others, and if anyone has more knowledge to share I'd like to learn more.

We had a wool moth infestation. It probably traveled up with me from Portland, lay dormant for years, and resurfaced in 2004 or so. I thought we cleaned the problem up, but I have now learned the measures I took were probably entirely ineffective. The moths came back last summer. (Or, it may have been an infection from a wool item bought used. Now I quarantine wool that comes into our house, regardless of whether it was bought new or used.) I threw out some expensive suits and one very nice wool hiking sweater. I took measures. The problem abated, but has not entirely gone away.

When the problem recurred last winter, I found moth damage on the sweater and two wool suits. I threw out the now hopelessly damaged items and started researching.

There are two problem moth species: the webbing moths and the casemaking moths. The casemaking moths are rare here, and the casings they leave behind are obvious. You can get pheromone traps for the webbing moths. The "Pro-Pest" ones seem to work well and are available via Amazon and etc. The traps attract male moths, which then get stuck to the trap. They are supposed to be good for 3 months, but seem to still be pretty effective after 6 months, at least at room temperature.

When I discovered the moths, I ordered some traps, and looked into what wool moths liked and what killed them. Clothes moths like dark, warm places that smell like humans. They lay their eggs in wool that has human sweat, urine, or the like on it, as this is what the larvae eat. Apparently they don't need the wool to live so much as our blood, sweat, and tears, so to speak. So clean wool is usually safe. Besides wool, moths will sometimes infect silk, down, and in rare cases even cotton.

Dry cleaning kills the moths, so everything dirty that was dry-clean only went straight to the cleaners. (Washing and drying clothes does not reliably kill moth eggs.)

Cold kills moths, but slowly. Suddenly taking clothes from room temperature to a cold freezer and leaving them there for a week should do it, but I am not super confident in this method.

Heat kills moths. Half an hour at 120 degrees should do it, so I cranked the sauna up to 140 degrees and put the remaining clothes in for about an hour. This method is more difficult than it seems. I used a radiant thermometer to find out what temperature the clothes were really at. Just because the room is 140 degrees doesn't mean the clothes are.

Permethrin kills moths. We have plenty of permethrin around. It's an insecticide. We treat clothing we are going to wear in areas where malaria is endemic. Once it dries on the clothing, it's almost entirely non-toxic to people. Also, permethrin repels bed bugs. We've never had bed bugs, but we visit a variety of hotels, so I treated our luggage inside and out with permethrin to discourage bed bugs from hitching a ride on our luggage. And, permethrin kills clothes moths. So I put on a respirator and the big rubber gloves and sprayed down all of the seams and crevices of all the closets that had had wool in them.

The permethrin and sauna treatments were hot, sweaty jobs, but seemed to work. I put the moth traps in the closets, and, well, moved on.

But I did some more research. I found out two interesting things:
- Moth speed of development is highly temperature dependent. This means that they are more likely to emerge in the summer.
- Carbon dioxide kills all life stages of moths.

A CO2 concentration of as little as 15% should kill moths eventually, and higher concentrations should kill them in a few days. I decided that, to be sure, I'd shoot for a CO2 concentration of over 95% and hold it for a week.

My first test was with a more-or-less airtight plastic storage box that I put the skiing woolens in at the end of ski season. I put about half a pound of dry ice wrapped in a rag at the bottom, put a heavy book on the lid, and left the latches open. As the dry ice sublimated ("melted"), the CO2 gas would collect at the bottom, and displace air at the top. At the time, I didn't have a real way of measuring if it worked, but recently I found out it had. It doesn't take long doing this to realize that you can smell really high concentrations of CO2. It's the smell of getting a fizzy drink up your nose, without the wet part. So, when I opened the box of winter woolens recently, I could smell the CO2 that had been there since spring. I have to think that any moths or moth eggs were long dead.

I had decided to treat our woolens once or twice a year, just to be safe. My method was to buy Space Bag storage bags. These bags seal air tight, and they have a vacuum port. (Several of these bags are shown in the picture, above.) Put the woolens in the bag with a chunk of dry ice wrapped in a rag. Suck all the air out. Close the cover on the port until the bag starts to inflate. Open the port. As the pressure inside the bag rises, it will push air and CO2 out the port, until the final CO2 concentration will be quite high. Leave for a week. It works great. I know, because after I open the bags after a week, I can smell the CO2 in the bag quite easily.

But a funny thing happened, just as I was about to embark on the Space Bag project: I had been checking the moth traps every week. Never a moth. I decided to Space Bag treat the woolens at the end of an unusually warm and dry August.

Literally as I was collecting the woolens to bag them, I checked the traps one last time. They all had moths, in some cases, quite a few. So now I know the traps work.

Where did the moths come from? I don't know. I literally checked all the wool and silk in the house, including carpets. Nothing. No holes, no dead moths, no webbing, nothing. Did they come from outside the house? Maybe. They might also have come from some bulky wool sweaters where damage might not be obvious.

Actually, none of my theories for where the moths came from are all that persuasive. So I don't really know. I treated with CO2. Most of the woolens are in airtight storage now, and almost all of the rest will be soon. I ordered fresh traps. I plan on treating the woolens twice a year until we go two years with no moths in the traps.

To be continued....

1.11.2012

Shim, Shimery

Leo Stone reminded me of the Zen and the Art of Motorcycle Maintenance-derived adage "One man's beer can is another man's shim stock."

Well, I had some shimming to do, and I didn't have any shims in the house, so I went out and bought me a can of Rainier shims....

I had noticed a while ago that the front disc on my commuter bike was not true. This was undesirable, as it meant I couldn't have the pads as close as I'd like without them rubbing. You want the pads close, so you can brake as hard as you like without the brake levers bottoming out, especially so with road bike levers.

I finally got around to it and took the wheel off the bike, put it in my truing stand, and measured the lateral runout with the nice dial indicator Dad got me for Christmas. (Or maybe for my birthday? Hmm. It's been a busy winter....) Lateral runout was 6 mil. That seemed like a whole lot. I pulled the disc off, and the mounting face had less than half a mil runout. So definitely the disc, but what to do about it?

So I asked around, and that's when Leo hit me with his adage. (Good thing it wasn't an adze.) So I bought a can of Yakima's finest hops from the local Wino Convenience Store. After disposing of the, um, packing, I was left with an ample supply of 4.5 mil shim stock. (The picture shows my digital caliper. I would have used my vernier caliper, but then the picture would have been hard for you, my loyal reader, to interpret, at the resolution available.)

Now, how to make a few doughnut-shaped shims, otherwise known as washers? It was then I remembered Nick Carter admonishing me to read up on Jig and Fixture Design. The key to a good jig they say, is a lively tune, but what do they know? The key to a good jig, as Ed Hoffman asserts, is locating the work. If you can't locate the work, then how can you work it? It seems prima facie obvious, but there you are.

How shall we locate washers? By their holes shall we find them, I say. [To be continued.]

10.06.2009

Spoke Tension Gauge

The DT Swiss spoke tension gauge is a thing of beauty for anyone with a serious bike tool fetish. (That would include me.) It feels good in the hand. It does a cool thing. It looks good doing it.

It's also over $500. Oops.

So I have lusted after a DT Swiss spoke tension gauge in vain. But no more. No, I haven't decided to pay more than most people pay for a bicycle on a tool I use for maybe ten hours per year. No indeed. I have done much better.

Bryan found a spoke tension tool from Park that cost only $60. Is it as accurate as the DT Swiss gauge? I'd guess not. But how accurate a spoke tension number can one actually make use of anyway? Plus, the Park tool seems very repeatable, and repeatability is actually much more important than absolute accuracy.

How accurate it is depends on how well it's calibrated and how well it holds calibration. The design looks like it will hold calibration tolerably well, so I think this gauge will serve well.

So far, I find the Park tool positively lovely. I'll compare it to the DT Swiss unit at Wright Brothers' bike co-op and report back.

So what does a spoke tension gauge do? It measures the tension of bicycle wheel spokes. This is useful when building wheels, particularly back wheels, to make sure you have the spoke tension right. Guys who build wheels all day long don't need a tool like this because they can do it by feel. Except there aren't any guys who build wheels all day long anymore. And back in the day, those guys were probably not nearly as good at feeling spoke tension as they thought they were. I'm never going to build 100 wheels a year, or probably even 10 wheels a year, so I do much better with a tool.

10.01.2009

Earthquake-Proof Your Wine Cellar

I added to the new DIY section of my web site with an article on how to earthquake-proof a wine cellar.

Originally, I wrote this for Wired's How-to Wiki. That article got dozens of Diggs, but Wired's How-to wiki seems to be dying a slow death. In fact, my vanity web site has a higher pagerank than the wiki article. So maybe more home handypeople will find this information useful, now that it's in a more prominent place.

9.21.2009

DiNotte Light Charger

Like many, I'm a fan of DiNotte bike lights. They're bright and durable. The Pro series uses ordinary AA batteries, and so can be powered with inexpensive rechargeable batteries. The only problem is prying the batteries out of the battery pack to recharge them.

Not any more. About a year ago, I built a couple of chargers that allow me (and my friends) to charge the battery packs without taking the batteries out. (It was Brian Pratt's idea, so props to Brian.)

I have put up a web page with complete instructions to build your own DiNotte battery pack charger. It's preposterously simple.